Posts in Recipe
Cavatelli rigati alla vodka
Cavatelli alla vodka

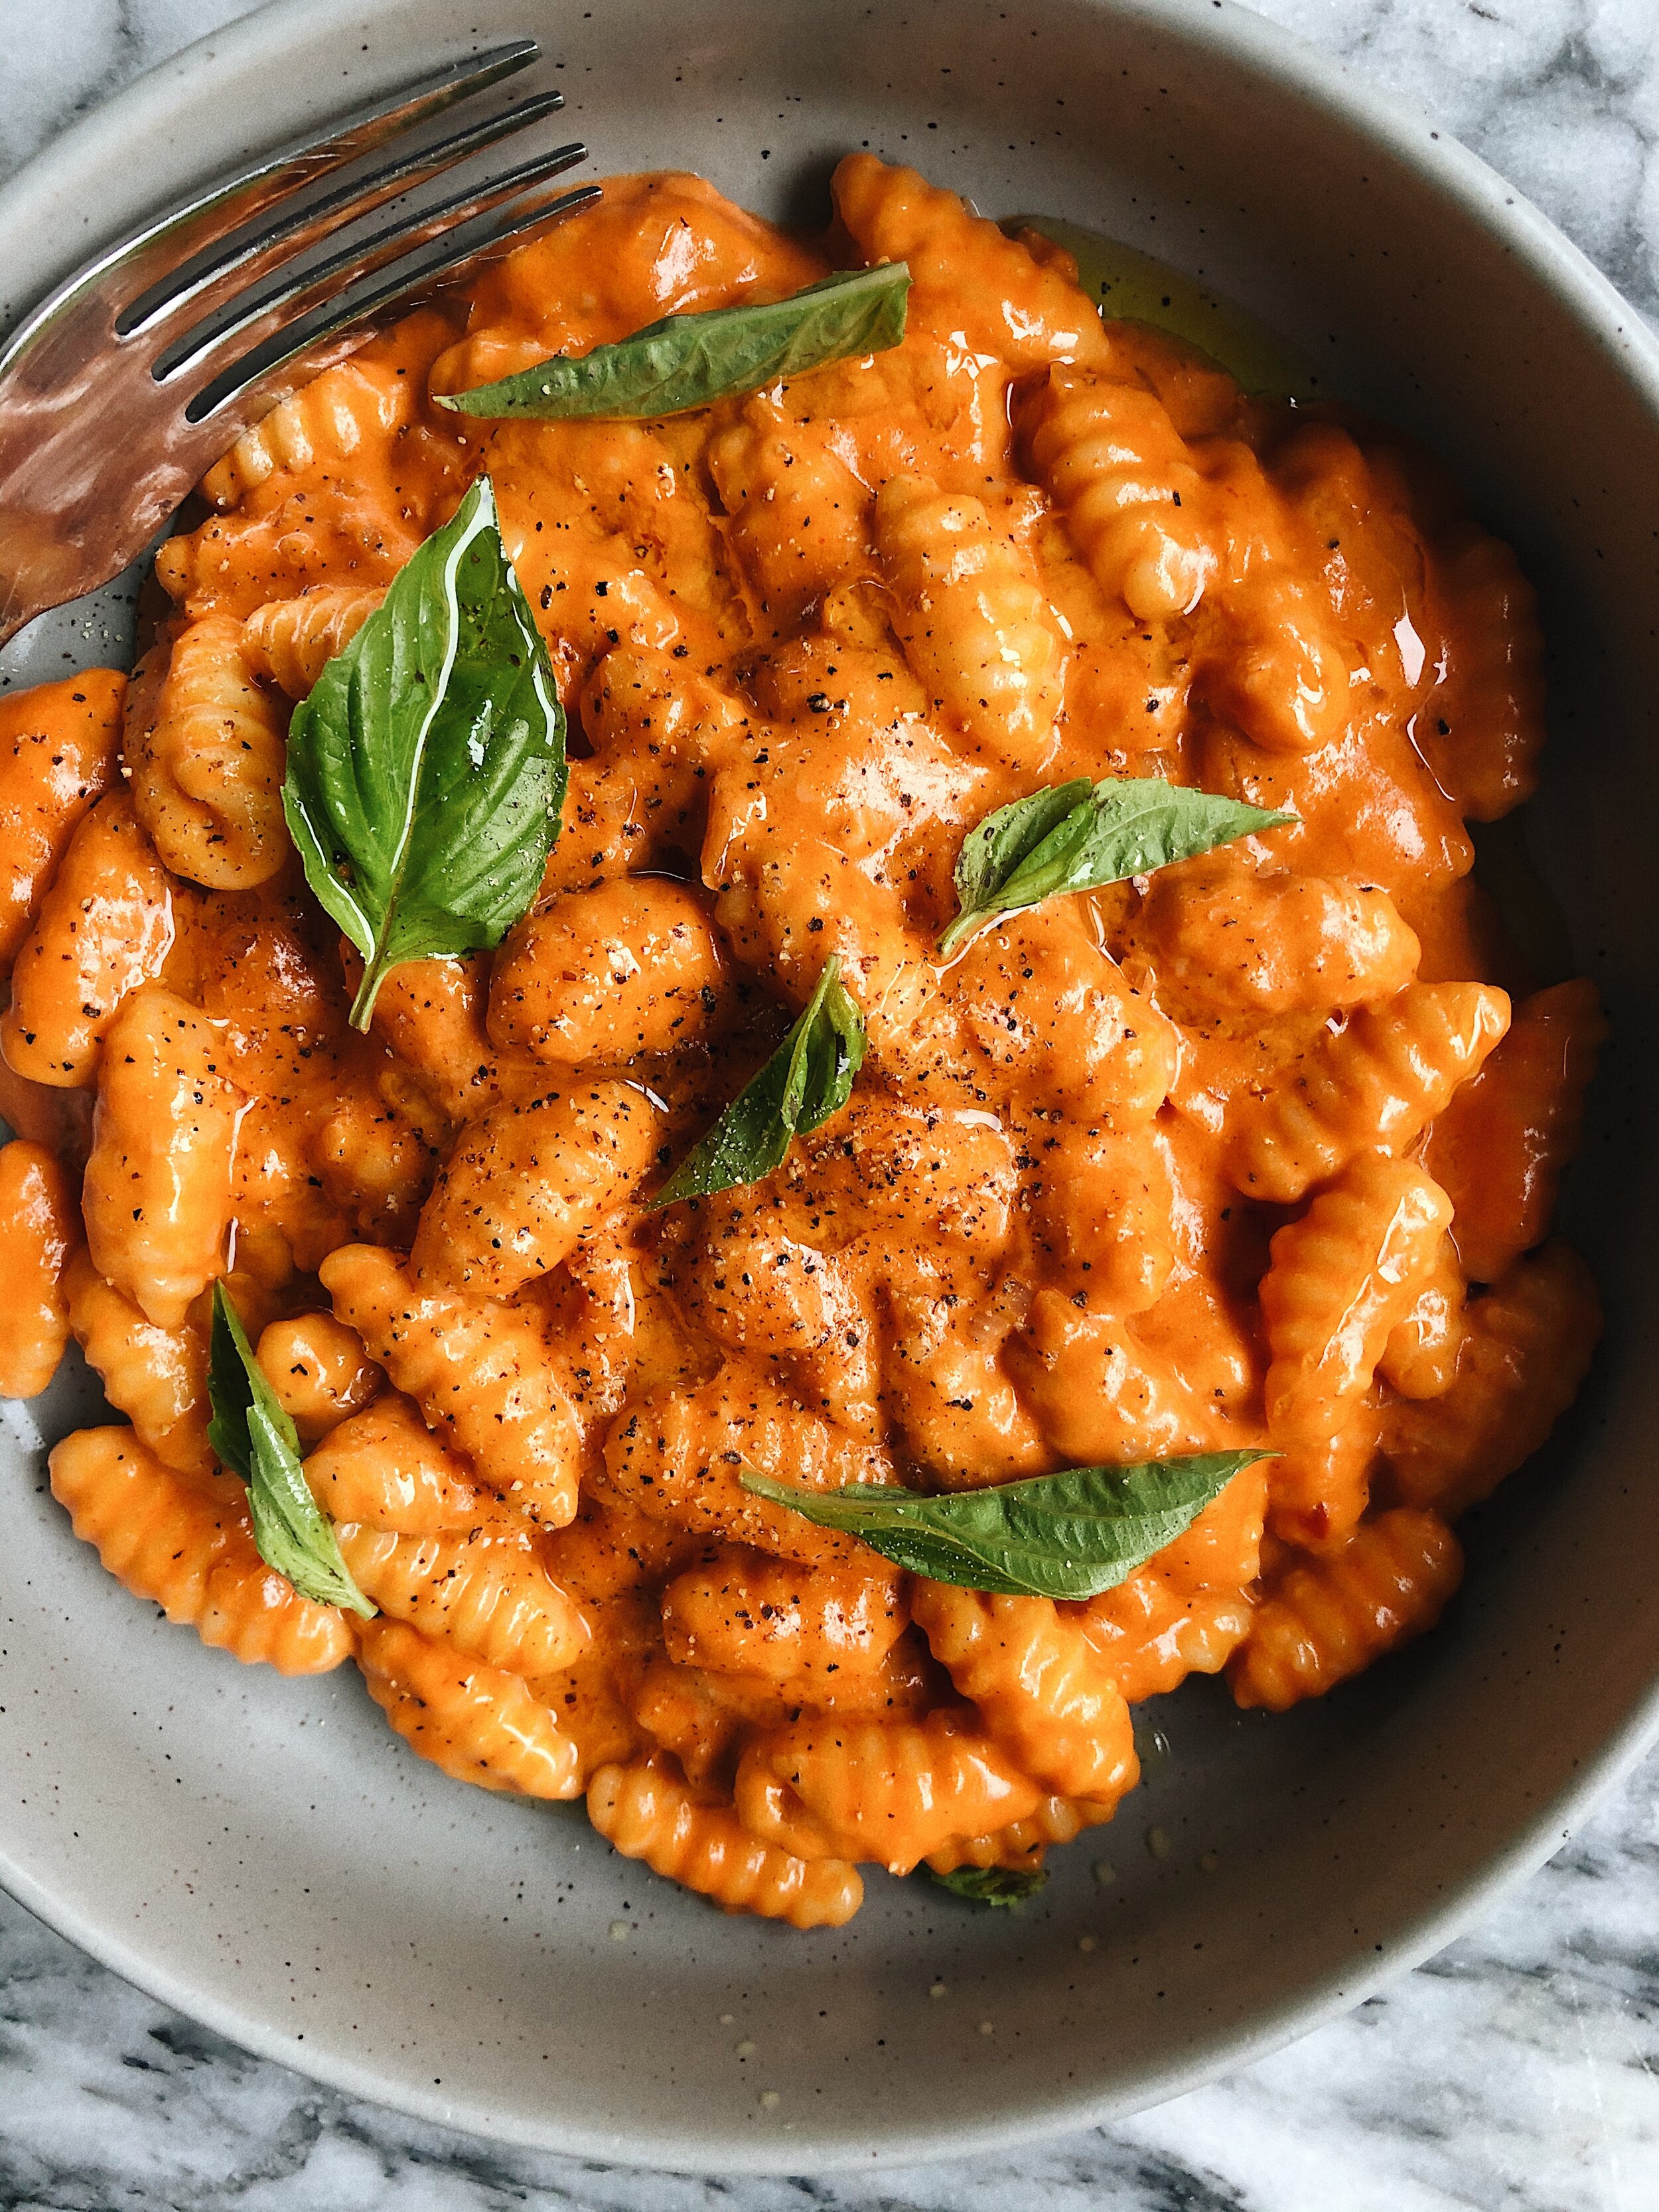
Continuing with my passion for making fresh pasta at home (you can follow along for some pasta appreciation here) I dipped my toes back into the waters of hand rolled pasta with a batch of cavatelli rigati or cavatelli with ridges. You could also call these little grub-like pasta gnocchetti sardi or malloreddus, which I’m sure some pasta purists/Sardinians might argue is the correct name for these for whatever reason (DM me for a rant). Ultimately as far as fresh and hand rolled pasta goes, these are incredible easy to make and catch sauce beautifully in their ridges, so their name doesn’t really make a difference to me.

OK so let’s talk sauce. Alla vodka is traditionally a combination of crushed tomatoes, onions, cream and of course its namesake, vodka. The origins of this ridiculously moreish sauce are disputed (like most great things), but I like to think this was conjured up in the kitchen of Dante in Bologna during the 1980s, which is what Pasquale Bruno Jr., author of The Ultimate Pasta Cookbook reckons. Typically the pasta of choice is penne, but I think anything with ridges - or rigate - work just as well, which is why this cavatelli makes for a perfect pairing.

After first trying this dish in the Swiss-Italian region of Ticino back in ~2010, over the years I’ve tried a number of recipes to recreate the magic at home, always following the more traditional method of using crushed tomatoes and cooking them down over time. Totally delicious, but never making the cut to become a return favourite.

Enter tomato puree.

Now I’m not really one to follow celebrities, and I really never thought I’d be looking to Gigi Hadid for a recipe. But! she did happen to popularise this recipe by posting about it on Instagram, and it introduced me to subbing crushed tomatoes with tomato puree. Using tomato puree results in a super silky sauce with a beautifully concentrated tomato flavour, and as an added bonus it can be made in less than 10 minutes. (Side note: credit where credit’s due; I’ve got to give my mate Becky some kudos for getting me onto this recipe after she cooked this for dinner one night (thank you)).

Cavatelli alla vodka

Cavatelli alla vodka

Serves 4

Sauce lightly adapted from here

METHOD

FOR THE PASTA DOUGH

  1. Add the semolina flour to a large bowl and make a well in the centre. Pour the water into the well.

  2. Using a fork, start to incorporate the flour into the water little by little, whisking until the liquid resembles pancake batter (note - the majority of flour should still remain around the sides of the bowl).

  3. Using your hands, start by scooping flour from one side of the bowl, and folding it over the liquid/pancake mix. Use your fingers to press the flour into the liquid until incorporated. Rotate the bowl 45 degrees and repeat. Keep doing this until all of the flour is incorporated and you’ve got a somewhat shaggy dough.

  4. At this point transfer to your work surface and knead the dough for 5-10 minutes until you have a smooth and shiny dough that doesn’t stick. If it’s too wet, add a touch of flour.

  5. Wrap tightly in clingfilm and leave to rest for at least 30 minutes.

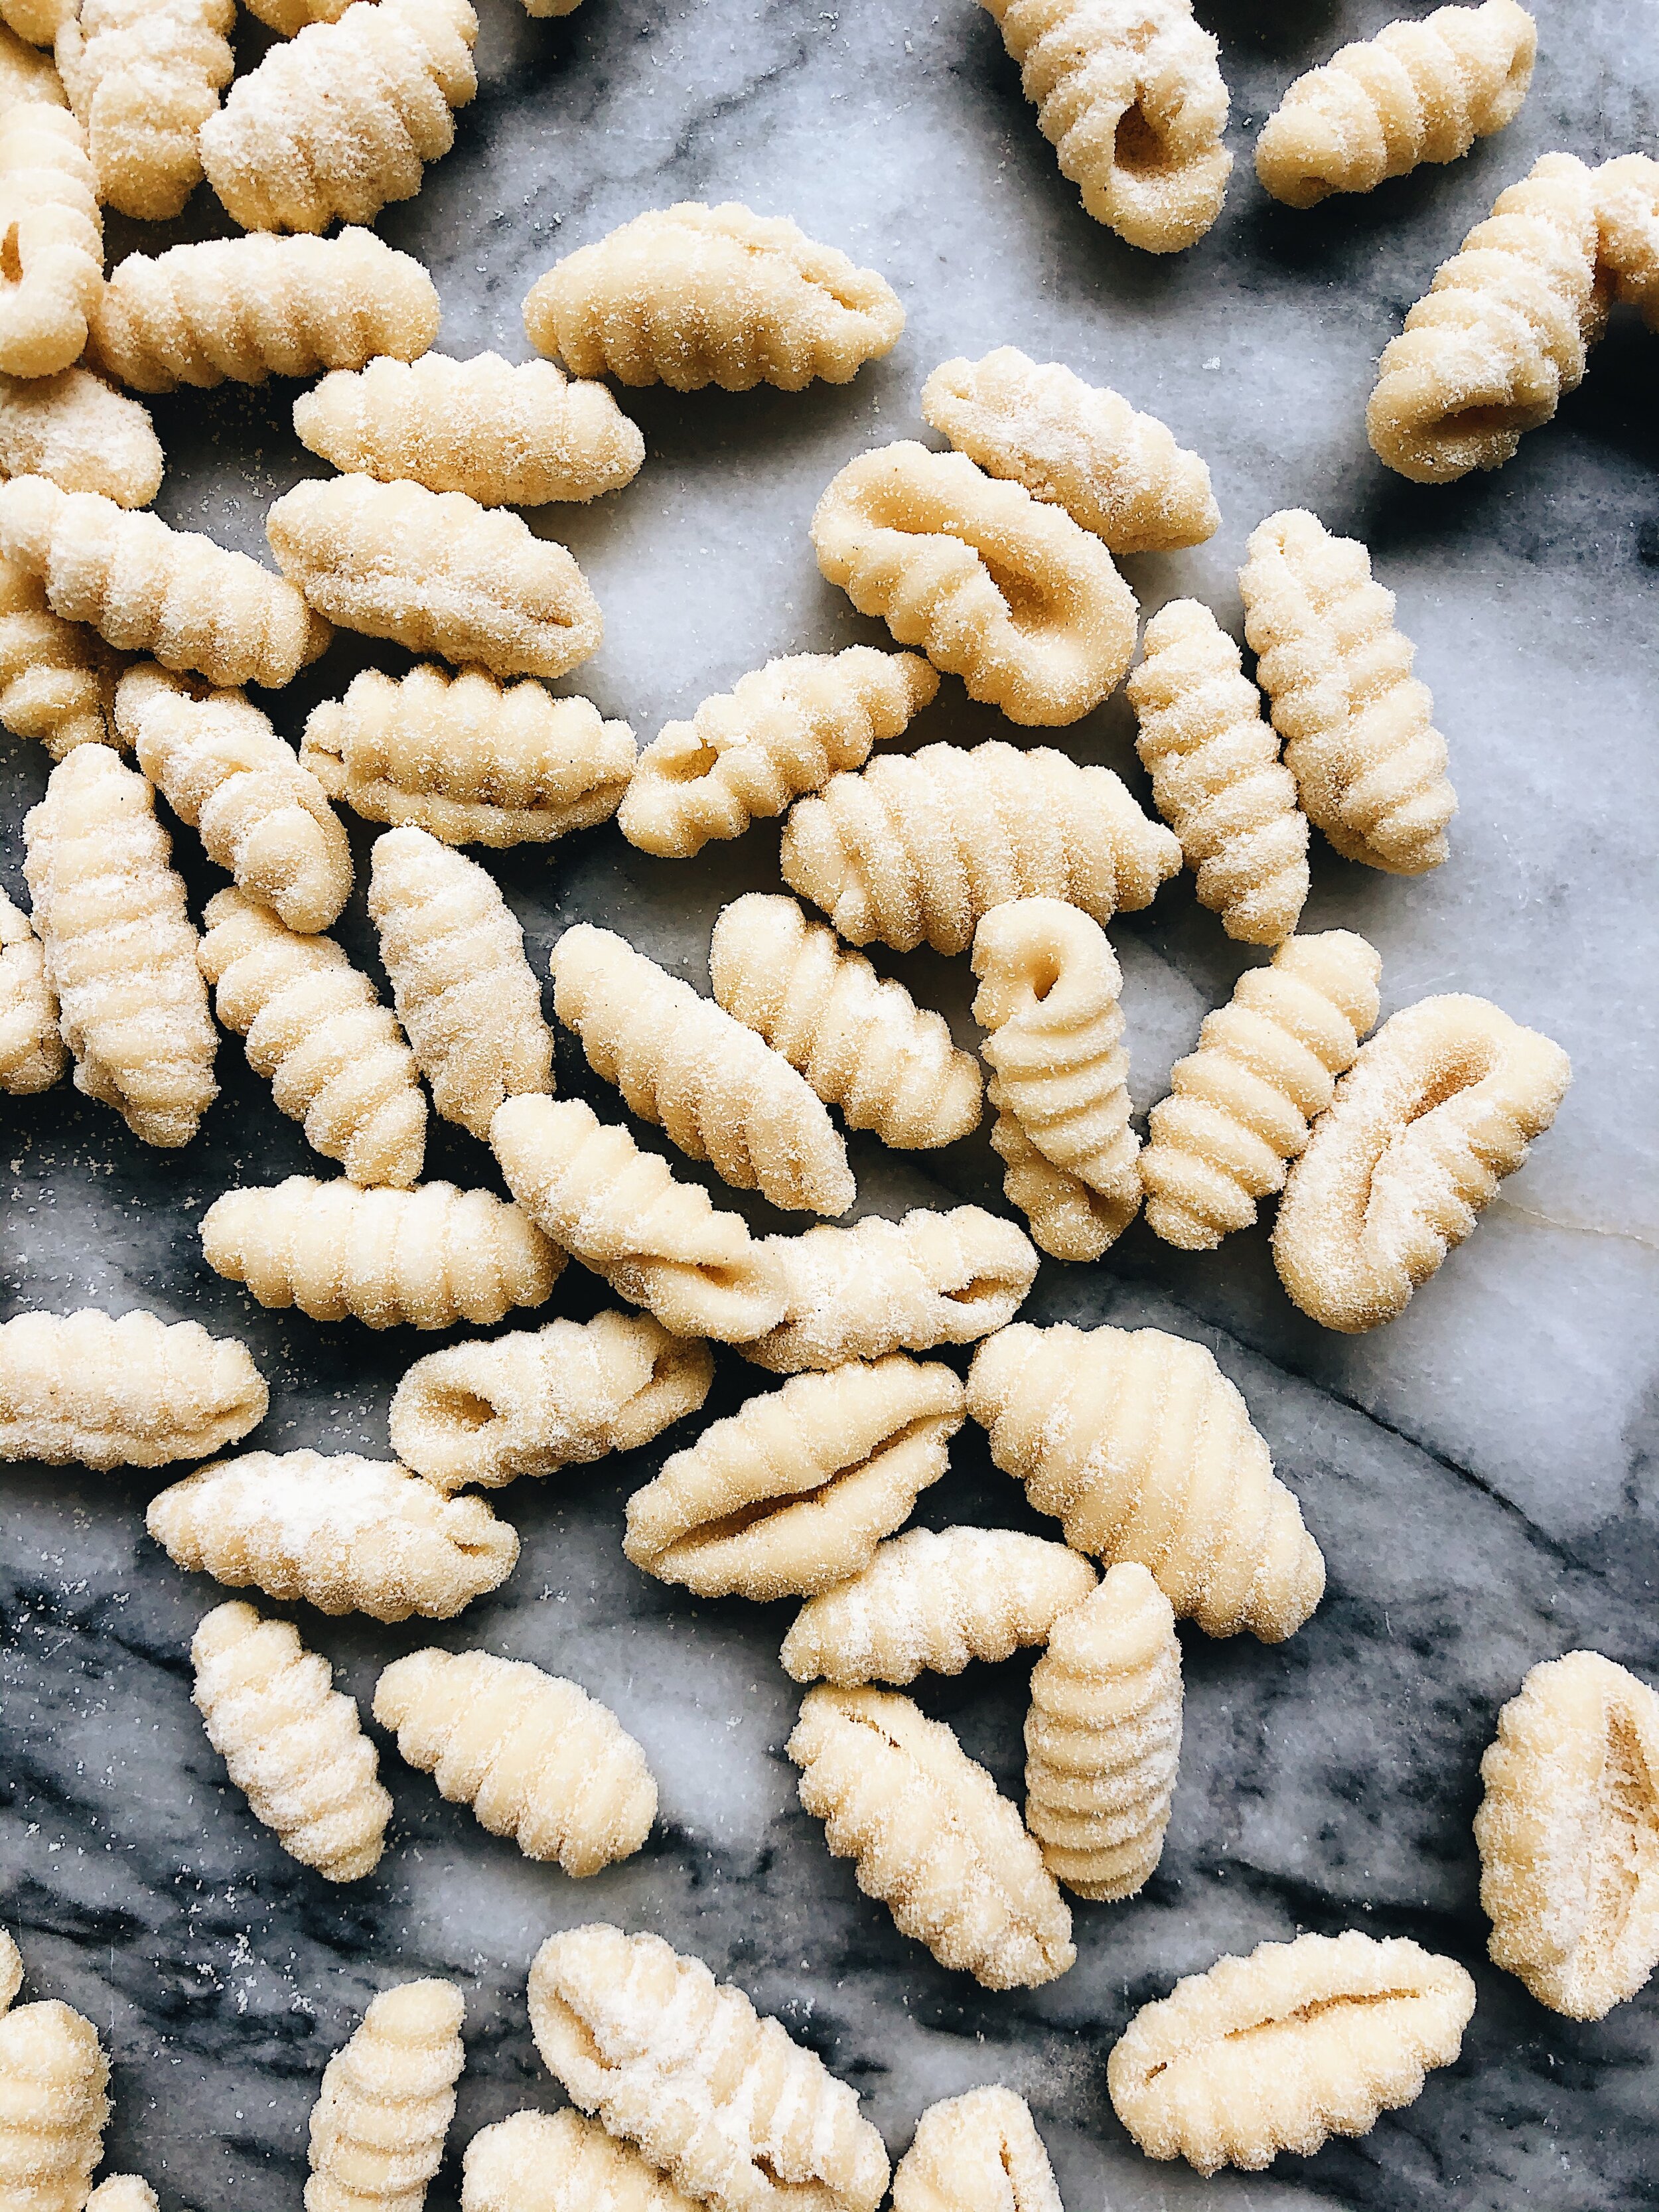
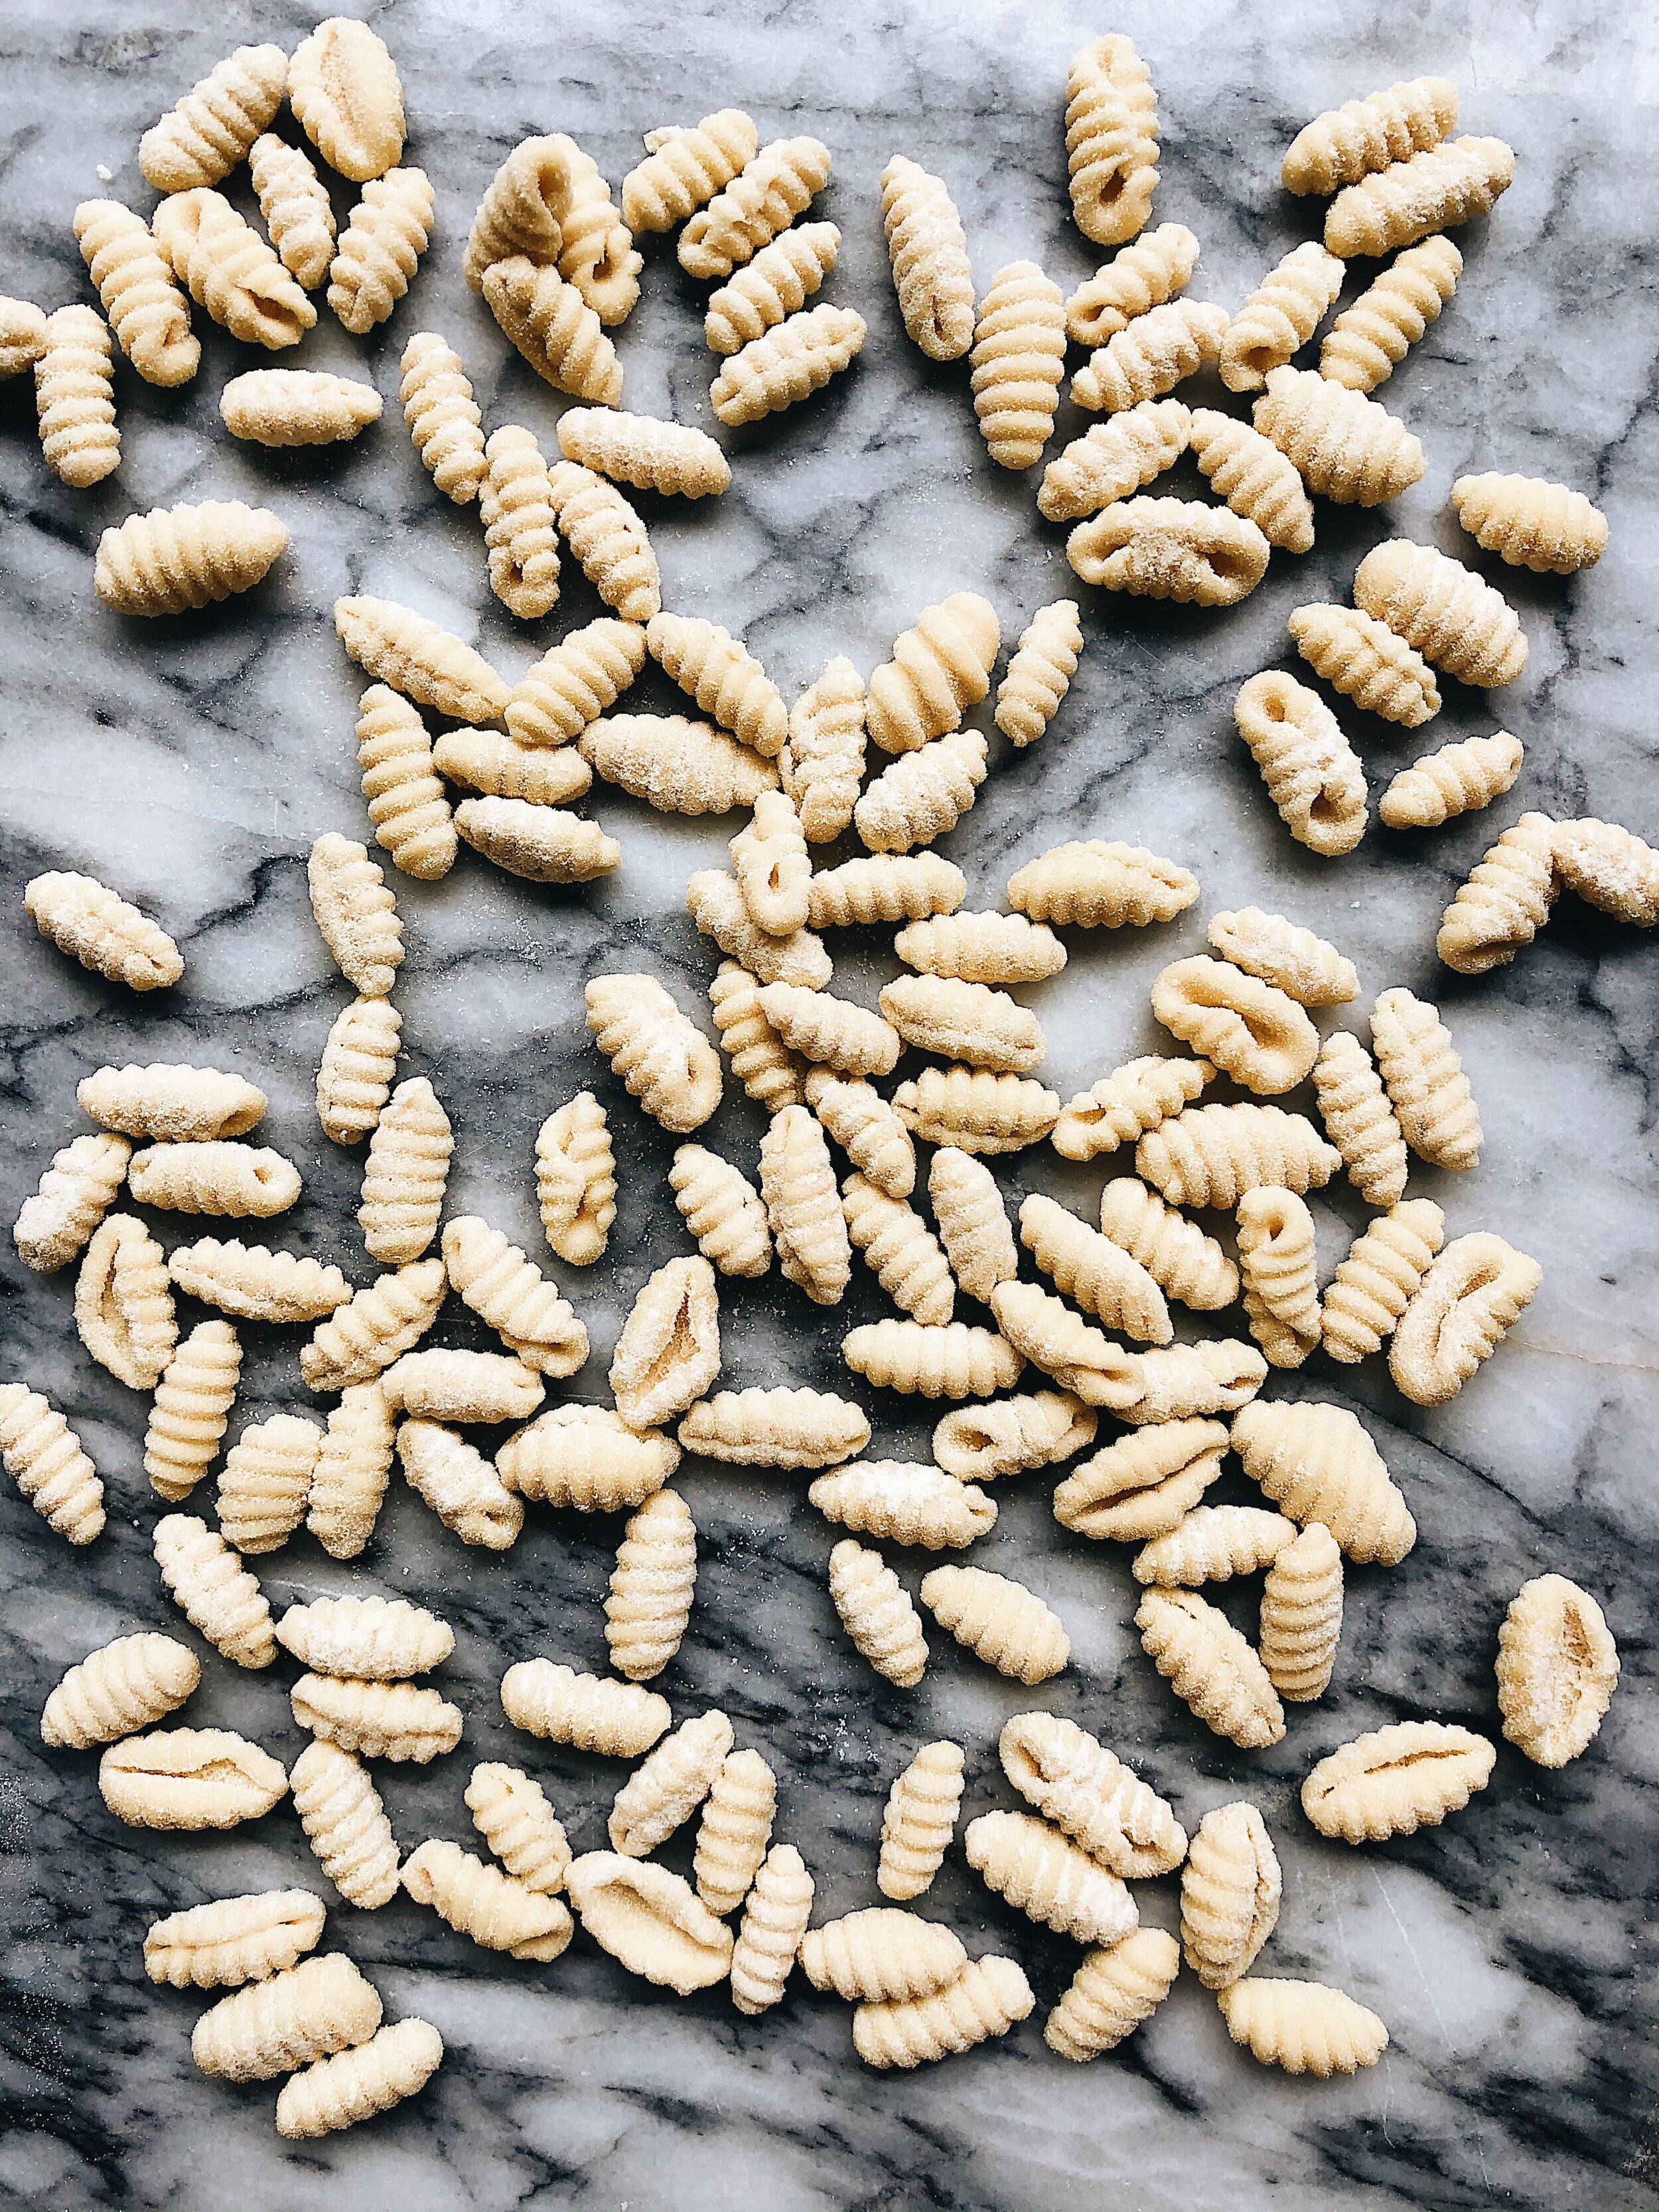
SHAPING THE CAVATELLI

  1. Cut off 1/8 of the rested dough (make sure to keep the rest covered in clingfilm while you work), and roll it into a sausage about 1/4” thick

  2. Cut the sausage into thumbnail sized pieces, and roll each into a little ball using the palm of your hands

  3. Using a gnocchi board (or a fork if you don’t have one), place one ball at a time at the side closest to you, and using your thumb press into the ball and away from you, rolling the ball as you do so. Repeat with remaining balls and dough following the same process.

  4. Place the cavatelli on a lightly floured board or plate and cover with a clean, dry tea towel until you’re ready to use.

FOR THE SAUCE

  1. Bring a pot of salted water to boil and cook the cavatelli for around 6-8 minutes depending on their size. Semolina/water pasta tends to have a chewier, denser consistency.

  2. Meanwhile heat olive oil in a large pan and add the chopped shallot, cooking for a few min before adding the garlic and chilli flakes.

  3. Add the tomato puree and cook for a minute or so until it takes on a deeper colour.

  4. Add the vodka and let the alcohol cook out (this should only really take a minute), then stir through the cream.

  5. Just before the pasta is ready, add the butter.

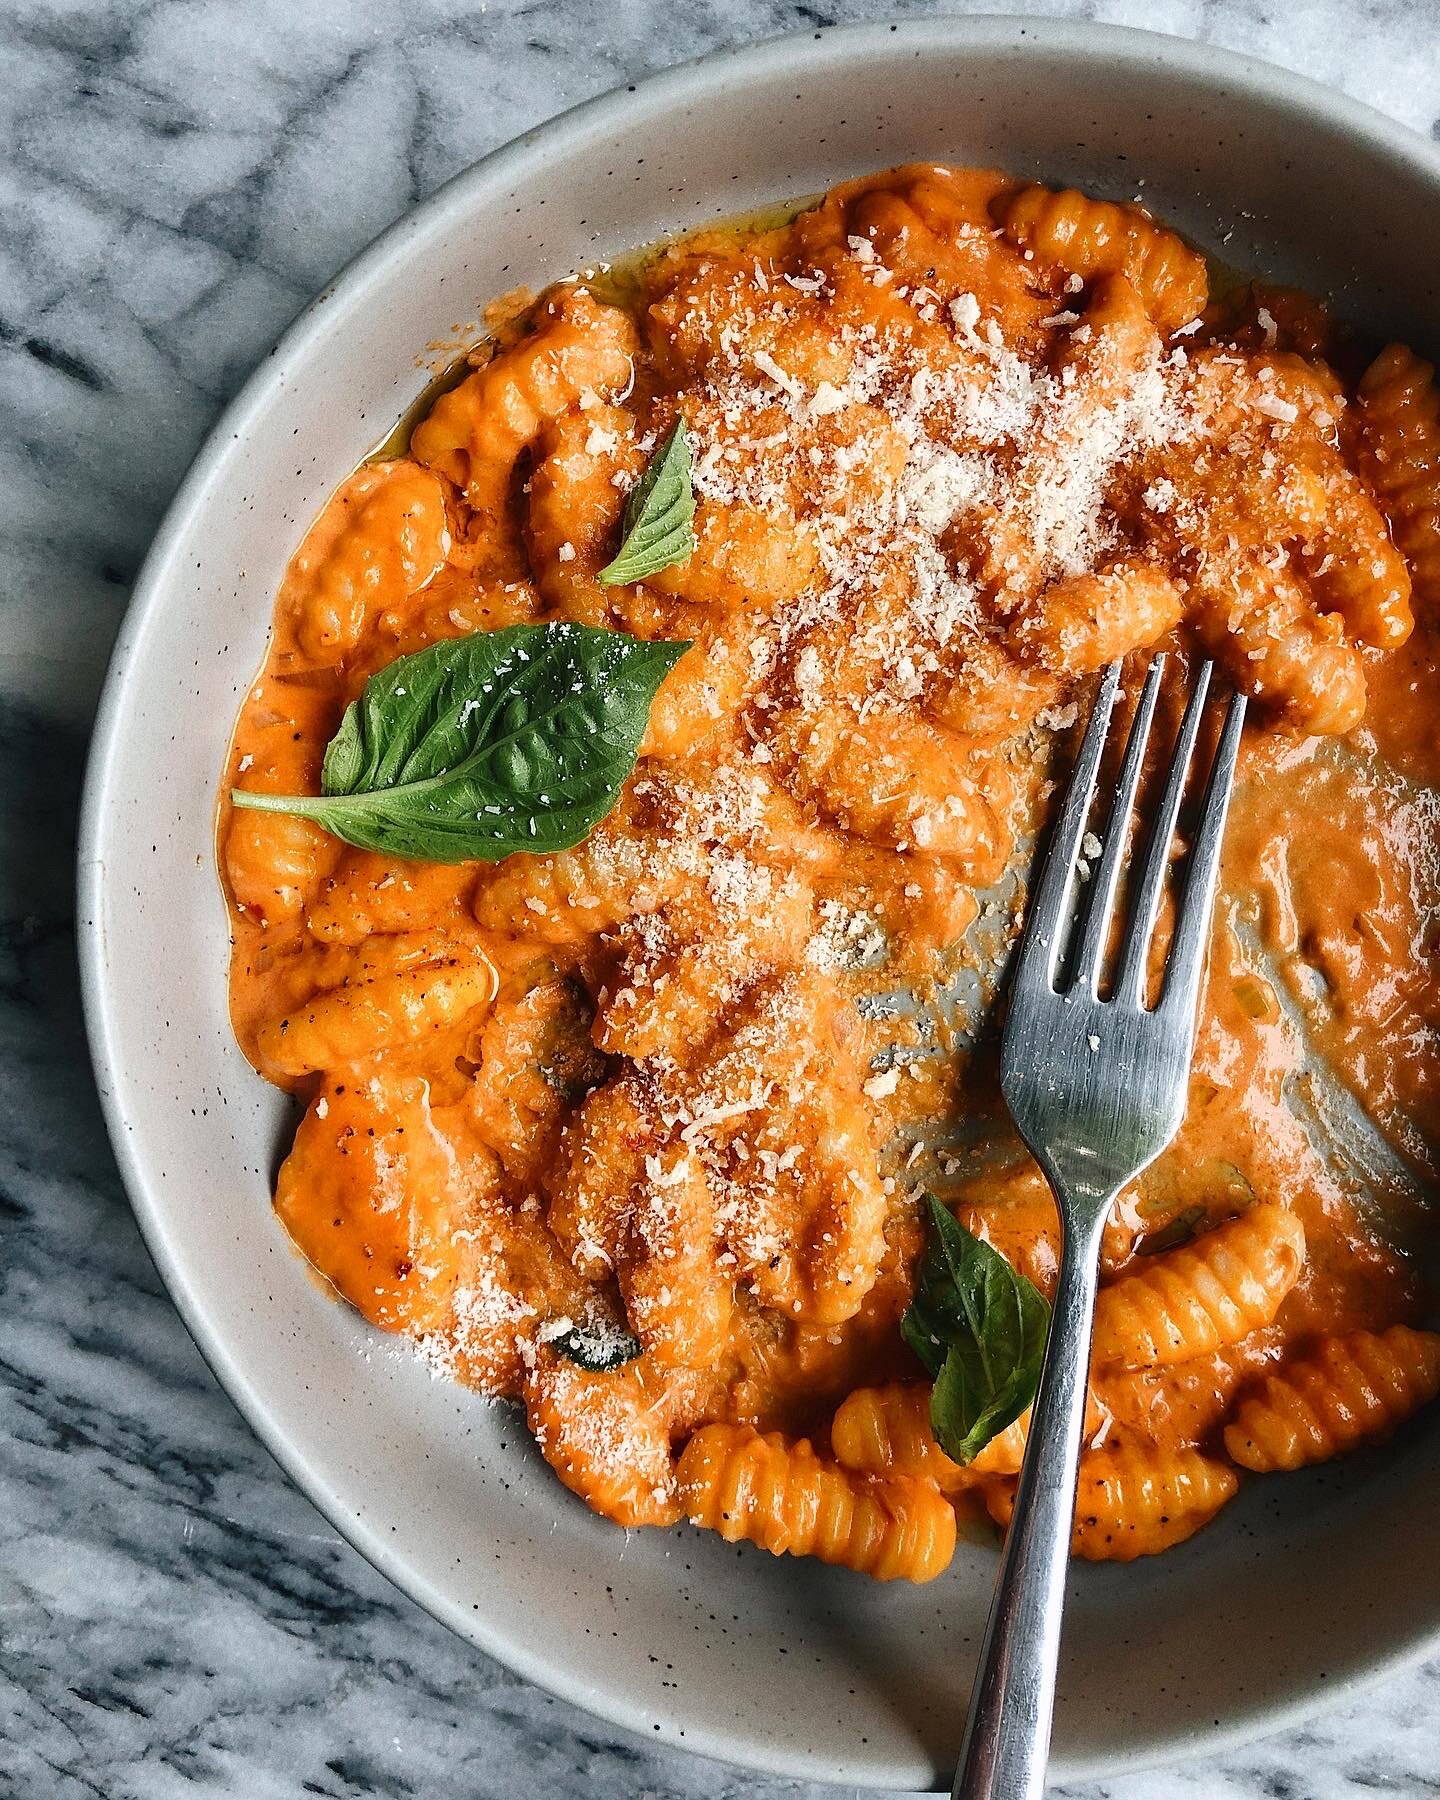
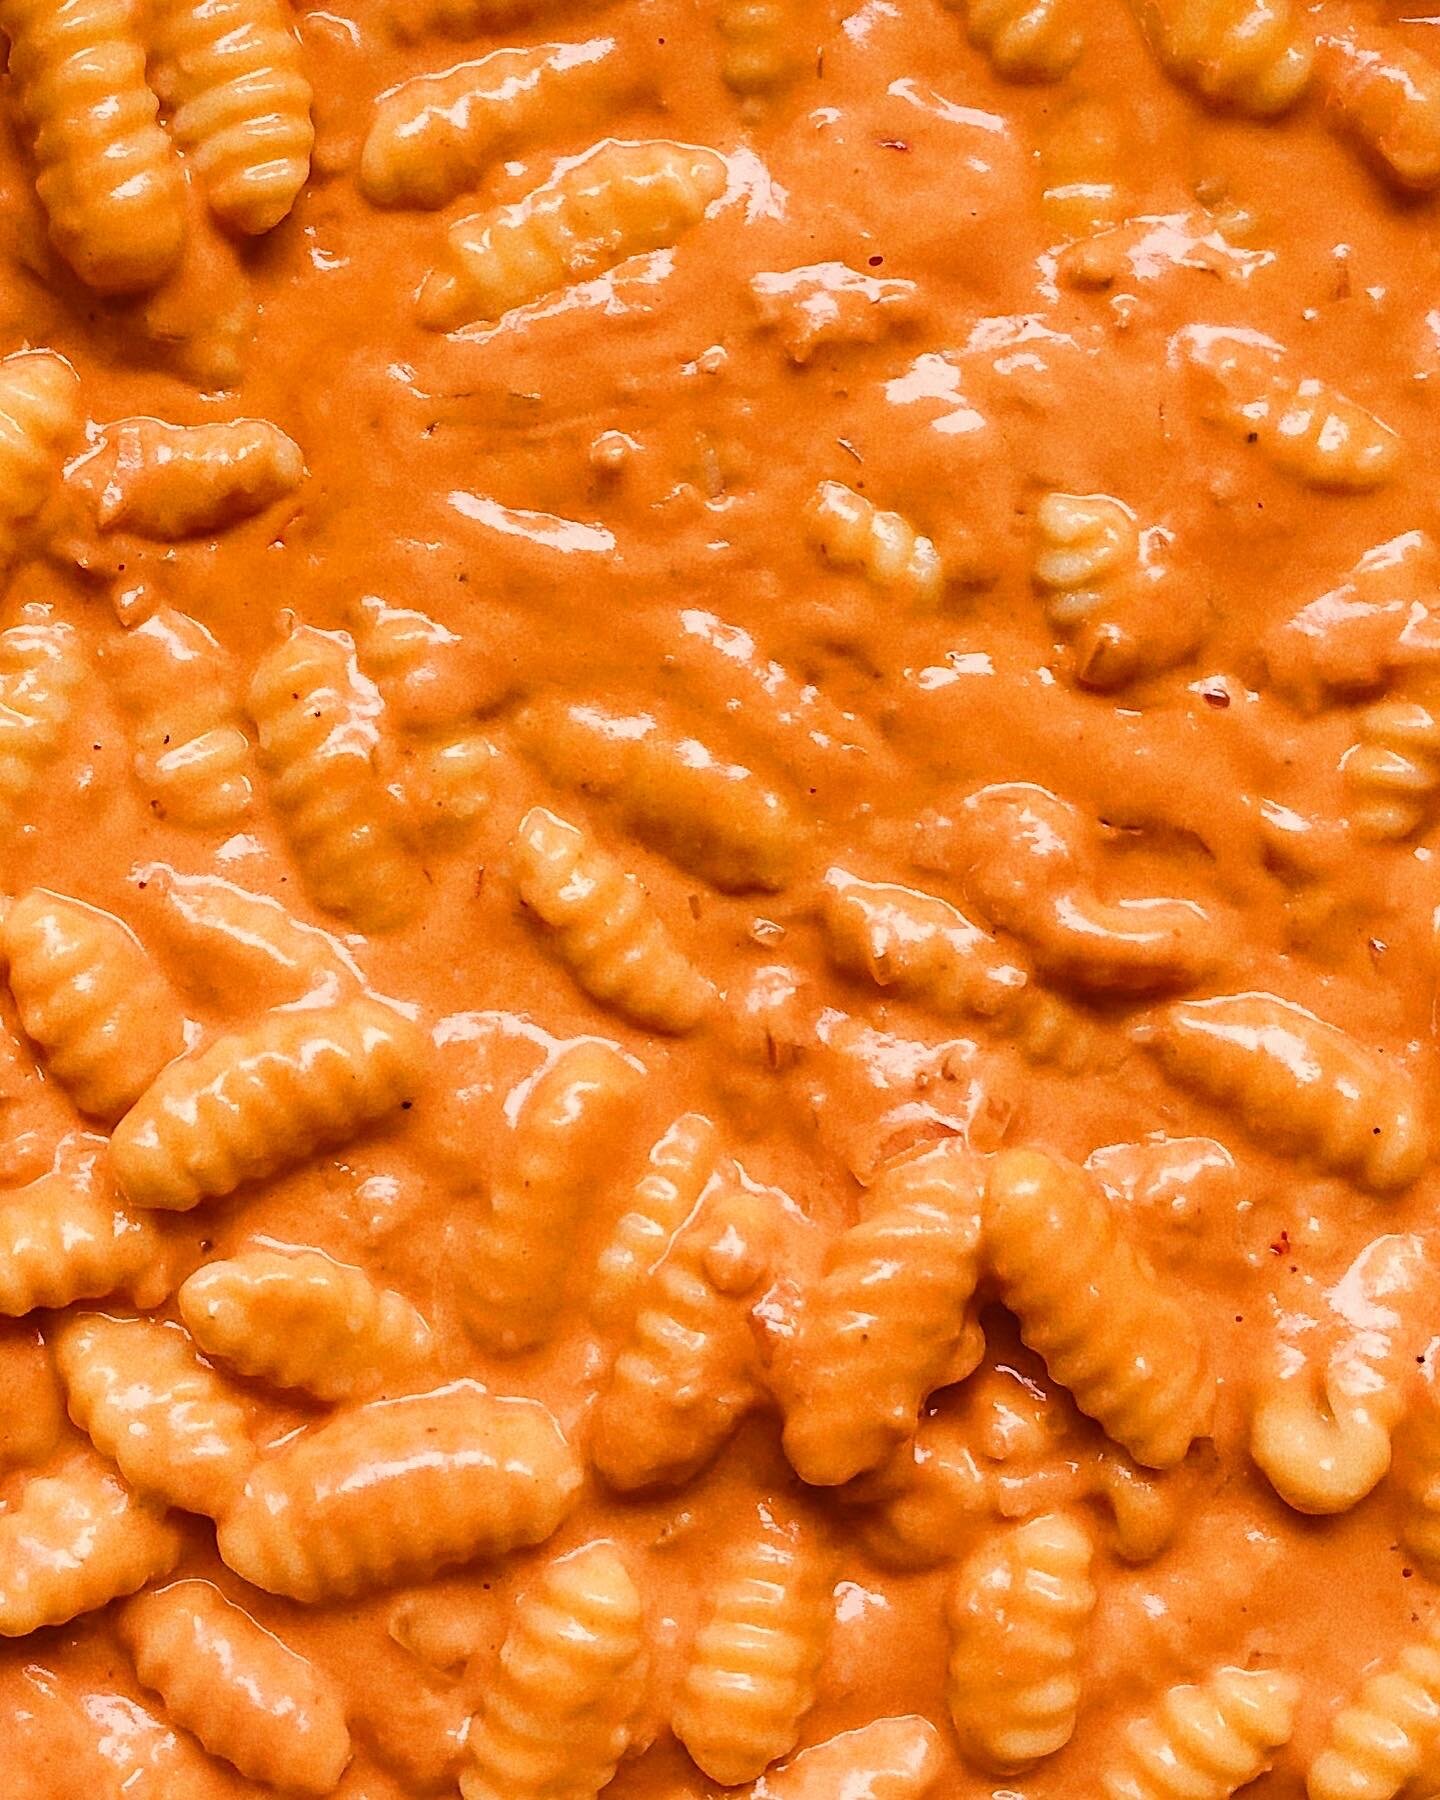
  6. Using a slotted spoon, add the cavatelli (along with some of the pasta water) directly to the sauce, stirring through with a good handful of grated parmesan. Check for seasoning and add a splash of pasta water if the sauce seems too thick.

  7. Serve with a drizzle of good olive oil, fresh basil and extra parmesan.

INGREDIENTS

FOR THE PASTA DOUGH

450g durum wheat semolina flour

225g luke warm water

FOR THE SAUCE

2 tablespoons olive oil

1 shallot, finely chopped

2-3 garlic cloves, sliced

1-2 tbsp dry chilli flakes (optional)

80g tomato puree

50ml vodka

120-140ml double cream

25g butter

A couple of handfuls of grated parmesan

Fresh basil to serve


Roasted carrots + carrot top pesto
roasted carrots and carrot top pesto

One of my favourite things about the neighbourhood we live in here in Brisbane, is the farmers market that sits right on our doorstep on Saturday mornings. When living in London, the desire to buy the weekly shop at a market was greatly outweighed by the necessary 30+ min journey just to get to one. Here however, between 6am to 2pm each week I can walk 200m from our building to Davies Park, grab an excellent coffee (I mean, the coffee is excellent everywhere here) and get my fruit, veggies, meat, fish and eggs all for the equivalent of around £50. To put that into perspective, it works out to about half of what I was spending per week back in Blighty.

So as you may have guessed it, this delightful side dish came about as a result of a recent market haul. I grabbed a beautiful bunch of carrots - tops and all - with the intent of simply roasting them. But looking at those tops I thought there’s got to be a way of utilising them, instead of them going to waste. A fiend for pesto shall always be just that, and I quickly blitzed those leafy greens up together with the necessary ingredients that I seem to always have on hand (pine nuts, garlic, olive oil and of course parmesan) while those multicoloured carrots were roasting to sweet perfection.

This recipe makes enough pesto to use another time - try stirring whatever you have left through pasta, topped on eggs or as a base for your next sandwich.

carrot top pesto
roasted carrots and carrot top pesto

Roasted Carrots + Carrot Top Pesto

Serves 4 as a side dish

Ingredients

1 large bunch of carrots with tops

2 tablespoons pine nuts

10 tablespoons mild/light olive oil

50g parmesan, grated

1 garlic clove


Method

  1. Preheat oven to 200c (180c FAN)

  2. Remove the tops from the carrots and place in an roasting dish. Drizzle with two tablespoons of olive oil, and season generously with salt

  3. Roast in the centre of an oven for 25-30 minutes or until tender

  4. While the carrots are roasting, get to work on the pesto. In a blender add the carrot tops, garlic, pine nuts, a pinch of salt and the remaining 8 tablespoons olive oil and blitz until combined.

  5. Transfer the pesto to a bowl and stir in the grated parmesan. Add more salt as needed, and an extra glug of olive oil if you see fit.

  6. Once the carrots are roasted, serve with a few dollops of pesto.

Hot Green Tahini Sauce

While mindlessly scrolling through the digital equivalent of 500 tonnes worth of cat memes on Instagram, something stood out: a green chilli sauce. Usually, I'd slow clap the vibrant hue of green, give it a nod of approval and move on. But when I saw the word tahini in the ingredients let's just say my interest was piqued

Hot green tahini sauce | Gabriella Simonian

I absolutely love tahini and anything that it's in. I'm talking fan girl territory, a sweet ode to my Cypriot heritage with hummus being the obvious contender for most loved tahini recipe - until now. This sauce is capital letters LEGIT and I have been putting it on everything from steak to chicken, to mixing it into salad dressings and using it to add an extra dimension to the usual egg and avo combo. If you follow me on Instagram and have ever felt compelled enough to watch my stories, you may have noticed my new found obsession for this sauce because I have been preaching hard. 

The recipe comes from my all time favourite bon appétit and is another example of why they are IMO the best food magazine out there - they deliver the goods time and time again (and can we take a moment to applaud them for likening this sauce to the summer sandals you wear with everything? So true.). But of course it wouldn't be like me to ever really follow a recipe to the T, so my take on this punchy little number uses some garlic scapes I picked up from the market along with a single clove of garlic, a little less lemon and a touch more heat from an additional serrano pepper. I promise if you try this you will be just as obsessed as me. 

Hot green tahini sauce | Gabriella Simonian

HOT GREEN TAHINI SAUCE

Makes 2 cups, lightly adapted from here

Ingredients

2 lemons (zest of one, juice of 1.5)

3 serrano peppers 

1 garlic clove

2 garlic scapes, chopped (or just use an additional garlic clove)

3 cups curly leaf parsley, roughly chopped (discard stalks)

60ml extra virgin olive oil

120g tahini paste

Salt


Method

  1. In a blender, grate in the zest of a lemon and add the juice of 1.5 lemons, discarding any pips.
  2. Add the garlic, garlic scapes, serrano peppers, parsley, olive oil and roughly 75ml water and blend until you have a smooth sauce.
  3. Transfer the sauce to a bowl and stir in the tahini paste - season with salt to taste.
  4. That's it! Keep refrigerated in an airtight container. 


I think this tastes better the next day, when the tahini has thickened the sauce and the flavours have developed and settled. Keeps well for a week. Maybe longer but I wouldn't know because I eat it too quickly. 

Roasted miso salmon with brown rice + scallions

So... hi. It's been over two years (!!) since my last post, possibly the longest hiatus from a blog the world has ever known.  

Roasted miso salmon with brown rice and scallions

Truth be told, a lot has happened. When my mum was diagnosed with terminal cancer in May 2016 everything changed, and by November that year I left my job to look after her - simultaneously the easiest and most difficult decision I have ever made. In short, it was the most painful time of my life and everything took a backseat while I navigated through heartache and grief - including this blog. 

Fast forward to today - a little over a year since she passed away - and I feel like I'm slowly coming out of the fog and starting to pick things back up. A conversation with a friend asking me about whether or not I'd update this blog again prompted me to post this - something a little fun on a sunny, chilled out Sunday.  

This is my dream food on a plate, a combination of all the good fats, protein, nutty brown rice and a mash up of flavours - plus it's pretty healthy too. I like to hit the salmon at a high temp for a short amount of time so it's just cooked through with a nice finish on the outside. Add as many or few components as you like - avo and a pop of pickled cabbage work a treat for me. 

Roasted miso salmon with brown rice and scallions

Roasted Miso Salmon with Brown Rice + Scallions

Serves 2

Ingredients

For the fish:

2 salmon fillets

1 tbsp brown rice miso paste

1 tbsp maple syrup

2 tbsp fresh orange juice

For the rice:

400g cooked brown rice 

2 tbsp light soy sauce

1 tbsp rice wine vinegar

1 tbsp toasted sesame oil 

Small handful slivered almonds, roughly chopped

1 tbsp sesame seeds

Garnish:

2-3 scallions, peeled

Micro greens

Avocado

Pickled red cabbage


Method

Preheat oven to 220c (200c FAN) 

  1. Mix together the miso paste, maple syrup and orange juice and pour over the salmon fillets - leave to marinate for as long as you can spare. 
  2. Transfer the fillets to a baking tray and cook in the centre of your oven for 15-16 minutes. 
  3. Meanwhile, toss the rice with soy sauce, rice wine vinegar, sesame oil, almonds and sesame seeds and season to taste with a little salt if required. 
  4. Plate the salmon alongside the rice, top with the peeled scallions, micro greens (if using), a side of avo and a heaped tablespoon of pickled cabbage. 
The World's Best Guacamole

Modesty is a virtue, but this really is the best guacamole ever so any modesty I may usually have has gone straight out the window.

The World's Best Guacamole | Thyme & Honey

I know this isn’t necessarily authentic guacamole for lack of tomatoes and red onion, and the garlic in this will surely make traditionalists sneer, but if there’s any true test to its greatness it will be that the raw onion and fresh coriander go totally undetected by my many onion hating, coriander bashing friends. 

Grating the onion and garlic right into the avocado means this can be whipped up in a matter of minutes, which is handy when it will inevitably be devoured at the same rate. Just make sure your avocados are ripe (essential) and that you have plenty of tortilla chips, because guacamole without tortilla chips is a very sad dip indeed.

Given that the lime and raw onion possess magical abilities to prevent the avocado from oxidising, adding the stones is less of an extra careful precaution and more of a doesn't this look kind of pretty? decision. I like to serve mine with a sprinkle of hot chilli flakes, chopped coriander and a glug of the best quality olive oil I've got. 


Guacamole

Makes one big ass bowl

Adapted from Heidi Swanson’s Guacamole recipe

Ingredients

4 ripe, medium sized avocados

1/4 white onion, finely grated

1 garlic clove, minced

Tabasco hot sauce

Juice of 1 lime

1/4 teaspoon salt

Fresh coriander, finely chopped

Hot chilli flakes and good quality olive oil to serve


Method

  1. On a chopping board, mash the avocado with a fork and then transfer it to a large bowl. 
  2. Directly grate in the onion and garlic clove and mix well. 
  3. Add around 10 dashes of Tabasco and the juice of a lime.
  4. Add 1/4 teaspoon of salt and taste - add as needed. 
  5. Finally stir in around 2 tablespoons of chopped coriander.
  6. Serve drizzled with olive oil and top with extra coriander and chilli flakes. And tortilla chips, obviously.
Dark Chocolate + Sea Salt Cookies

My quest for the perfect chocolate chip cookie began some time ago, you could say to the point of obsession. I've been playing around with recipes for a good couple of years, determined to find the holy trinity of cookie greatness; that crunchy Maryland style exterior, chewy Millie's Cookies vibe and a hint of shortbread madness, and up until now my attempts have been futile and full of failure - tasty failure - but still failure nonetheless. 

And then I found the one. I first tasted the best cookie in the world at Cafe Grumpy in Chelsea, NYC. I clocked that bad boy through the glass counter, skeptical of its vegan title given its clear good looks. Obviously I felt compelled to try it, keen to prove its mere existence wrong - surely it couldn't be good and vegan, I scoffed. I carefully removed it from the grease-marked brown paper it had been wrapped in and dove right in.

It was delicious. The first bite took me by surprise, 'but it's vegan!' my brain screamed at itself, sure that there had been some kind of error on the labelling. 'Those grumpy coffee aficionados must be messing with me', I concluded before inhaling the rest of the best cookie I had ever tried in about 0.3 seconds flat. 

When I got back to London I began trying to recreate the magic, and settled on using Ovenly's vegan choc chip cookie as a base. The first attempt was incredible, following their recipe pretty much to the T I found that I had a deliciously classic, chewy and slightly crunchy cookie - but it was missing that shortbread aspect I like so much. I wanted it to be crunchy, chewy and crumbly all at the same time. What can I say, I'm hard to please. 

I revisited the recipe, this time subbing canola for coconut oil and found that I had struck GOLD. The dough itself was more shaggy and crumbly, but came together nicely when I pressed it into mounds - like a shortcrust pastry would. When the cookies emerged from the oven, just crisp yet almost lava-like before cooling, I basically couldn't handle my life

But I still wasn't 100% happy. They didn't have that speckled chocolate flex that I'm all about, the choc chips instead gave off too much of a cookie next door all-American vibe, plus I wanted a more balanced salt flavour, rather than a heavy game on top. 

This is where Lindt's Dark Chocolate with Sea Salt came in. Not too much salt but not too little that the flavour fails to come across, I chopped a couple of bars into chunks and shards and threw them into the mix. The result? Speckled, salty, crunchy, chewy, ever so slightly crumbly - everything you could want in a cookie. 

Suck on that, Chips Ahoy.   

Dark Chocolate + Sea Salt Cookies | Thyme & Honey

Dark Chocolate + Sea Salt Cookies

Yields approx. 18

Recipe adapted from Ovenly's heavenly Vegan Choc Chip Cookies

Ingredients

240g all-purpose flour

1 + 1/4 teaspoon bicarbonate of soda

1/2 teaspoon salt

200g Lindt Dark Chocolate with a Touch of Sea Salt

80g caster sugar

70g soft light brown sugar 

100g coconut oil

60ml water

Coarse sea salt flakes like Maldon for garnish


Method

  1. In a large bowl whisk together the flour, bicarbonate of soda and salt. Chop up the chocolate into small chunks and shards and stir into the flour mixture. 
  2. In another bowl combine the two sugars, breaking up any clumps with your hands or the back of a spoon. 
  3. Heat the coconut oil until melted, then add to the sugar along with the water - whisk until smooth. 
  4. Add the sugar mixture to the flour and stir to combine with a wooden spoon until no flour is visible and the dough just comes together - it should be quite shaggy, don't worry about this. 
  5. Cover the bowl with cling film and refrigerate for 12-24 hours - DON'T SKIP THIS STEP!
  6. After the dough has rested in the fridge, preheat the oven to 180°c (165°c FAN).
  7. Using your hands roll the dough into 2 inch balls (you should be able to make about 18) and place them on a baking sheet lined with parchment paper. 
  8. Use a spoon to gently press down the balls slightly, and sprinkle the a pinch of sea salt flakes. 
  9. Bake for 13-15 minutes until the edges are just golden. 
  10. Leave to cool completely before serving. 
Curried Carrot + Chickpea Salad

Episodic memories are those that form feeling toward a particular time or place. Personally I find these memories awaken when the seasons begin to shift from spring to summer, and a plethora of imagery comes bounding into view, leading to a babble of memories of idyllic nostalgia; the smell of Nivea suncream, the sound of the sea lapping methodically on the shore, slithers of blinding sunlight creeping through thick pine in the Troodos mountains - you get the picture. Ultimately these lucid dreams of summer result in me spending hours Google searching 'best beach holidays in Europe 20-whatever it is' and vowing to steer clear of ice cream in preparation for the big reveal come beach day. 

Curried Carrot + Chickpea Salad | Thyme & Honey

And so is life, 6 weeks prior to my departure for 10 days of unadulterated bliss, sea, sun, mountains, food and family I begin this torturous countdown that involves many a salad, and not so many an ice cream. My better self tells me it will be worth it, my lazy, sugar-loving self hisses at the former with pure hatred. 

I proceed with varying levels of sadness, denial and hesitation, but occasionally I find moments of victory is salads like this. Largely raw, eye pleasingly colourful and packed with protein, fiber, zinc, vitamins A & C, antioxidants and more wonderfully restorative and essential nutrients, this was quickly added to my arsenal of 'eat clean' recipes.

Using Madras curry powder in the dressing adds a unique smoky undertone, while the lemon juice keeps it fresh and zingy. If I wasn't avoiding dairy I'd have added a dollop of plain Greek-style yoghurt, or a few crumbly bites of feta. Oh, to dream (about everything I will inhale once I'm actually on holiday). 

Curried Carrot + Chickpea Salad | Thyme & Honey

Curried Carrot + Chickpea Salad

Serves 4, or 2 as a main

Ingredients

1 large carrot

240g cooked chickpeas

10 small asparagus spears

Handful of radishes, around 5 or 6, thinly sliced

2 tablespoons capers

30ml olive oil

1 teaspoon Madras curry powder

1/4 teaspoon ground cinnamon

Juice of half a lemon

Mixed salad greens - I used a mix of fennel tops and sweet leaves


Method

  1. Using a julienne peeler, slice the carrot into thin strips. If you don't have one of those peelers you can use a mandoline to slice the carrot into ribbons, and then cut the strips by hand. You can also use the mandoline to slice the radishes. 
  2. Remove the spears from the asparagus stalks and set aside. Use a vegetable peeler to create shavings from the stalks. 
  3. Place the chickpeas, carrots, asparagus shavings and radishes in a bowl and set aside whilst you make the dressing. 
  4. Combine the olive oil, curry powder, cinnamon, lemon juice and a good amount of seasoning, whisking well to combine. Pour the dressing over the vegetables and toss well until evenly distributed. 
  5. Blanche the asparagus tips in boiling water - submerge them for a couple of minutes before rinsing under cold water.
  6. Serve the dressed salad on a bed of leafy greens and scatter over the capers and asparagus tips before adding a final drizzle of olive oil. 


Blood Orange Marmalade

Today is one of those days where I find myself just looking forward to the next. Maybe it's because today is probably one of the most miserable days this year, and fittingly I've spent the majority of it either caught in the rain, or staring at it from within the warmth of my flat. Or maybe it's the fact that I'm still mourning the end of blood orange season that's putting me in a particularly bad mood. All I know for sure is that I'm finding a little slice of happiness in the memory of this sweet, citrus marmalade.

Blood Orange Marmalade | Thyme & Honey

Preserving fruit when it's in its prime is the best way to guarantee enjoying it when it's out of season, and I find citrus works particularly well in that respect. Blood oranges have a more intense flavour than their plain Jane cousins, and make for a pretty lip smacking marmalade. All you need to do is add a touch of lemon, a hefty amount of sugar and prepare not to burn yourself on hot jars after canning like I did. 

Just a note on the consistency here; I like to keep this marmalade quite chunky as I love that extra burst of flavour it gives, however you can get yours more jam-like if you cut the oranges up into smaller chunks. 

Blood Orange Marmalade | Thyme & Honey

*when blood oranges are out of season, you can substitute for regular oranges for an equally delicious marmalade.

Blood Orange Marmalade

Makes 2 small jars (roughly 340g)

Ingredients

8 medium-sized blood oranges

2 tablespoons fresh lemon juice

500g caster sugar


Method

  1. Remove the peel from the oranges, being careful to also remove any white pith. Using a sharp knife cut the peel into very thin slices and set aside. 
  2. Remove any membranes from the orange segments and cut into rough pieces. Place the oranges pieces, lemon juice and sugar into a heavy-bottom pan. 
  3. Bring to a boil over a medium heat, stirring often. Then reduce to a simmer and continue to cook for 45 minutes -1 hour until a candy thermometer reads 225°F. 
  4. Meanwhile, place around 2 tablespoons of the sliced peel (you can discard the rest or add more if you like) in a saucepan, cover with cold water and bring to boil over a medium heat. Reduce to a simmer and cook for around 5 minutes, then drain and set aside ready to stir into the marmalade in the last few minutes of cooking. 
  5. Spoon the marmalade into sterilised jam jars fitted with sterile lids. 
  6. Place the jars in a deep, heavy-bottom pan filled with boiling water. Keep the jars in the water bath on a medium heat for 10 minutes, or according to canning-pot instructions. 
  7. Carefully remove the jars from the water bath and place on kitchen towel - make sure the jars don't touch one another and have enough space. 
  8. Once cool you can store the marmalade in a cool, dark place for up to a year, but you'll need to refrigerate once opened. 


Mexican Street Corn [Elotes]

Where do I start with this one? There are so many great things about this grilled, creamy, spicy Mexican street food staple that attempting to put it all into words is no easy feat. 

Mexican Street Corn | Thyme & Honey

I mean, just look at them. Yellow as the sun with a cheeky bit of char, lathered in a completely unnecessary yet more than welcome chilli mayo dressing, topped with crumbled super creamy queso fresco (or feta works just as well), finished with a few zesty sprinkles of lime, a blessing of chopped coriander and a dusting of chilli powder for that all important kick. I'll let you digest all of that for a sec. It's kind of magical, right? 

A bite out of one of these beauties and you'll wonder why you have ever bothered eating corn another way. Seriously, what is the actual point of grilled corn on the cob with a bit of butter when you can eat them like this? That Clover advert depicting a grown man crying over a bit of butter rubbed half-arsed onto boiled corn has been selling lies to this nation for far too long. I am hoping that this recipe will put a stop to crap corn. 

So here I am, shouting it from the goddam rooftops of South West London! Banish the butter! Say no to bland, boiled corn! And get loco with your otherwise completely mediocre yellow knobbled large grain plant (apparently not actually a vegetable...?). 

PS. it just so happens to be Cinco de Mayo on, funnily enough, the 5th of May. If you know a better way to celebrate Mexican Independence, a historic event that most likely has nothing to do with you, than with these elotes then I challenge you to Mexican fiesta dual, your dish vs. mine. Sombreros, compulsory.


Mexican Street Corn

Serves 4

Ingredients

4 sweetcorn cobs, husked

65g mayonnaise

1 teaspoon Sriracha sauce

Zest and juice of half a lime

30g queso fresco, or feta

Chilli powder

Bunch of coriander, roughly chopped


Method

  1. Wrap each corn cob in aluminium foil and bake in the oven for 35 minutes at 200°c
  2. Meanwhile mix together the mayo and Sriracha and set aside.
  3. Once the corn cobs are done, finish them off by removing from the foil and putting under the grill for 5-10 minutes in order to char slightly. You can also do this on the BBQ. Keep an eye on them so they don’t burn, and remove them from the oven/BBQ once you’re happy.
  4. To serve, brush the corn with the mayo mixture then top with some lime zest and juice.
  5. Crumble over the queso fresco and shake a bit of chilli powder on top.
  6. Garnish with the chopped coriander, serve and devour.
Baba Ghanouj

Baba ghanouj, with its distinct smoky flavour and creamy texture, is up there with the best of Middle Eastern food in my book. Along with  hummus it holds a certain nostalgia for me, forever being on the table alongside fresh saj and soujouk when we'd sit down to eat with family in Cyprus. We'd usually keep a tub of it on hand back at home in London, but up until recently I hadn't really tried making it myself. 

Baba Ghanouj | Thyme & Honey

This was in part due to the fact I didn't have a gas range at home, and also because the purist in me remains stubborn on charring the aubergines instead of the simpler (and cleaner) process of baking them, but once I moved into my flat last year, equipped with a gas range cooker, I couldn't resist trying it out.  

There is a fair amount of debate concerning what makes the 'perfect' baba ghanouj, and writer Felicity Cloake tackles this quite well in her column for The Guardian. Like Felicity, I like researching and testing different takes on a recipe to get the perfect version, and among other resources I used her article as an aid in my quest for the ultimate creamy, smoky and garlicky dip. 

Personally I like enough lemon to taste but not enough to make the flavour obviously citrusy, a hint of garlic (1 clove per every two aubergines), and the essential ingredient, tahini - although just a little otherwise you'll end up with something more akin to hummus. The below recipe is what I consider to be the perfect baba ghanouj, and now that I've found the right balance the only thing likely to change when I make it is whether I garnish it with chopped mint or not. 

Don't let the process of charring it put you off, likewise if you don't have a gas hob don't let that deter you either as you can still make delicious baba ghanouj without this process. What I find is most important is creating the right balance of flavours according to your own personal taste - although I think you might quite like the recipe below nevertheless. 

Baba Ghanouj | Thyme & Honey

Baba Ghanouj

Serves 4

Ingredients

2 medium aubergines

1 garlic clove, minced

2 tablespoons tahini paste

Juice of half a lemon

Pinch of salt

Olive oil and pomegranate seeds to serve


Method

  1. Burn the aubergines using a gas cooker. Sit the aubergines on top of a low-medium flame, turning often. Cook until they are practically caving in on themselves. If you don't have a gas hob, prick and bake the aubergines whole in an oven set to 180°c (160°c FAN) for 30-40 minutes. 
  2. Leave the cooked aubergines to cool slightly before peeling away the skin. Place the flesh into a fine mesh sieve and leave to slowly drain for 20 minutes. 
  3. After draining, break the flesh up gently with a fork - I like to keep mine quite chunky but you can mash it up as much or as little as you like. 
  4. Stir in the minced garlic, tahini and salt. Add the lemon juice and taste - adjust with more tahini/lemon/salt as needed. 
  5. Serve with olive oil and pomegranate seeds.